Pages

Saturday, August 2, 2014

Friday Friend with Flair and Unity be inspired Challenge - 01 Aug #1

Hi everybody, happy Friday to you. 
Well, here come the Friday and of cause it's Friends with Flair Friday, and i'm so excited to tell you that i gonna share 2 post for today FWF Challenge! :)

For the first post, I'm going to share with your the birthday card i have made.
This cute little birthday card is made for my friend as we will celebrate her birthday tomorrow. 
The paper flowers and the flower border is punch out from few punchers which i just bought over from a book fair last weekend. To enhance the border, I added some stone to make it look different. I do like the outcome when the border and flowers put together and i just love these new punchers a lot!


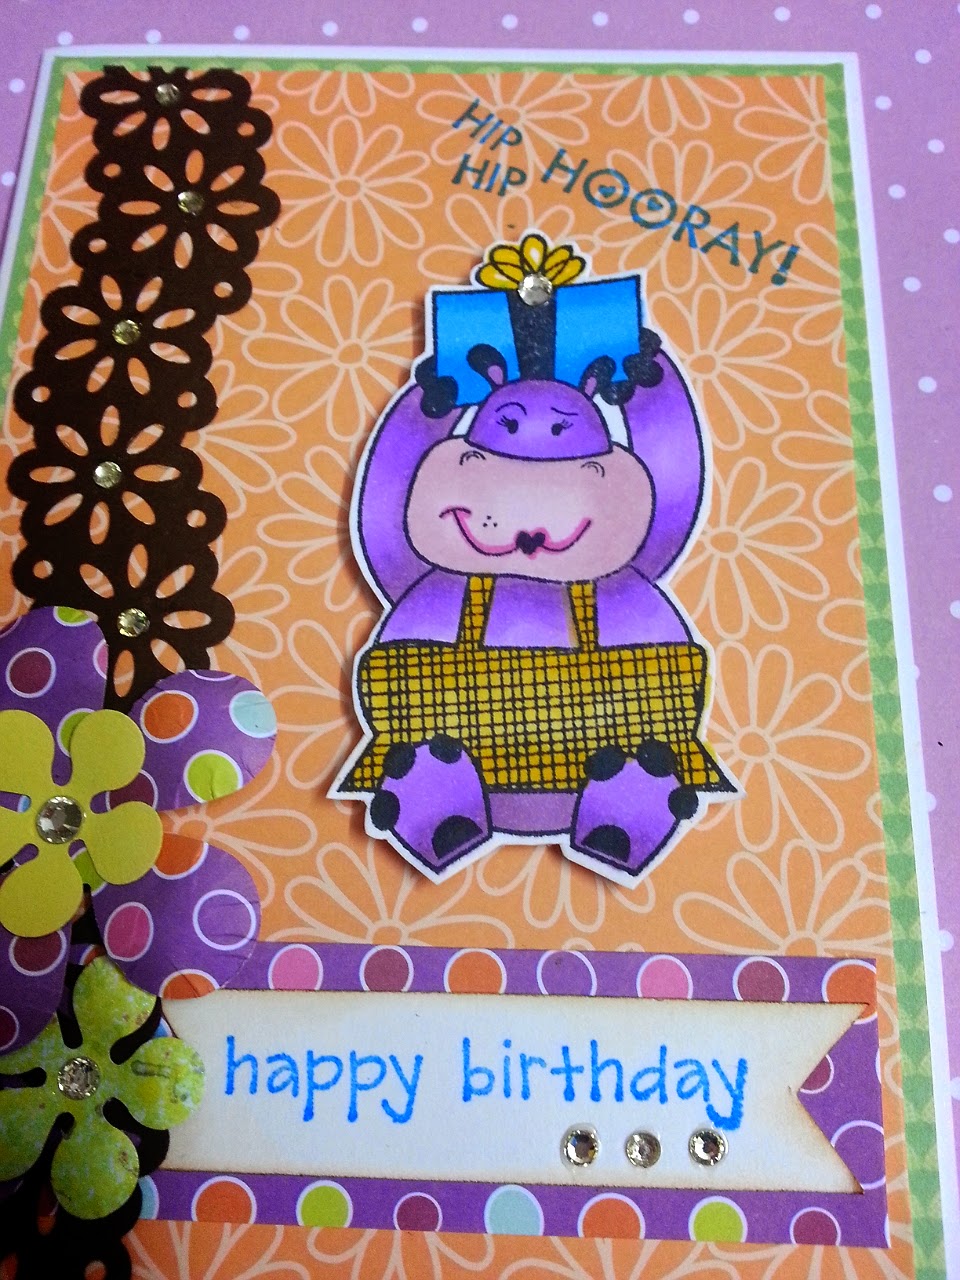
As for the image, i'm using Unity Hip hip Hooray Stamp. I bought this cute stamp last year, and today is my first try using this cute stamp, don't you think she is so cute? ;p


This is how the card looks like.
 If you do follow Unity Stamp monthly be inspired challenge, you will notice the color scheme that i used is inspired by this month Wish with your heart Challenge. You can actually link your art work to the blog page for a chance to win some fabulous gifts from Unity!


That's all for my first card, stay tune for my next post! :) Have Fun!

Saturday, July 26, 2014

Unity FWF and Monthly Challenge -25 July

Happy Friday everyone! 
Today, i'm getting myself involve in Unity friends-with-flair and Unity Monthly Challenge for the very first time!  I'm so nervous as this is my first post for both challenges and i do hope that my card can inspired other as well. 
Here are my 2 cards for today:


My first card is using Unity KOM 6/09 Perfect in Every Way Kit, and the Birthday sentiment is from Unity Party All Day Kit. The image just so cute and i decided to used it to create this Birthday Card.


As for the Second card, I'm really inspired by the Unity Monthly Challenge color scheme. I'm making an anniversary card for my hubby in conjunction with our 3rd year wedding anniversary celebration. The stamp i used is from Unity Insightful Meadows Kit. This kit just so awesome that you can apply for any project like card making, canvas, art journal and etc. Don't you agree with me?

Here is the Month Challenge inspiration for your reference:

That's all for my post today, thanks for stopping by. 
Do leave a comment for your chance to win a free gift ya!

Friday, July 25, 2014

Series of Thank you cards

I always find it difficult to do a thank you card for men, and here comes a challenge for me to teach a bunch of teenage boys from Boys' Brigade to do THANK YOU card for their sponsors for an event.
To make it simple for the beginner, I've do some samples to show them, using different technique and tools to help them to have more inspirations.

The first card is using a border punch, stamps, color card stock and a butterfly puncher. I colored the image with color pencil, and adding some stone as decoration.

The second card is rather simple, and to make it special for the boys, I've recycle a broken achievement badge from Boys' Brigade as decoration.This card become popular among the boys because the badge that i used for decoration is "Drill Badge", which very difficult to get it! :)

The third card is popular because of the emboss effect on the card. By using the check emboss folder and the "thank you" wording emboss folder, the card can be simple and pretty. 

The fourth card is playing along with the ink color. For the background, I'm stamping the sentiment in light blue ink, and on the heart shape card stock, I'm using the sky blue ink for the same sentiment. To make the card special, I used the white & blue twine to wrap around the white card, then i used the small color wood pin to pin up the heart shape. For the corner, i add some stone to make it outstanding.

 The last card is inspired by Fathers' Day. I've forget when is the last time I say "thank you" to my dad, and it inspired me to create this thank you card for fathers. The sentiment I used is from Unity Stamp Everything wonderful Kit, and these two words - THANK YOU - are not enough to express my gratitude to my parent! 

It's a good experience for the boys and for myself, we do have a lot of fun and new discovery during the session. Some of the boys do have the talent for card making and scrap-booking, hopefully we can have next class soon.
That's all for today post, thanks for reading. :)


Thursday, July 24, 2014

Card in a Box as birthday present

Oh yay, this is my first ever card in a box project. This is something new in the scrappy world, and the final product is so awesome! What i like about the card in a box is-- the outcome is like a 3D Pop up effect and it's so pretty when you display it on a shelf!

My first ever card in a box shown as below, and i do follow the measurement from Dina Kowal, you can check out the measurement from the link here.

I'm using some Prima Flowers, lace, paper doily, ribbon and some metal charms for decoration. 

Here is another angle.

A ribbon bow was tie when you lift up the front panel.

Front view.

Can see from top that inside the box is actually empty. 

The box can be fold flat and insert in a envelop as gift. But mine cannot as it flower is 3D flower, i can't fold flat for the card. :)
Thanks for stopping by.

Friday, July 4, 2014

First encounter with Shadow Box

Before i really hands on for the Shadow Box project, i really have no idea about what is Shadow Box. So i go online wiki the meaning of Shadow Box, here comes the description:

quote
A shadow box is an enclosed glass-front case containing an object or objects presented in a thematic grouping with artistic or personal significance. The grouping of the objects and the depth effect created by their relative heights from the backing creates a dramatic visual result. While shadow boxes have a strong tradition in military history, they are also frequently created purely for artistic goals.
unquote

And, i have my first encounter of Shadow Box with my scrappy master -- Angeline Choo, she is really great for teaching us how to make this shadow box!

This is the final outcome, did you see how gorgeous it is??


 We are using the Graphic 45 papers, Prima flowers and some metal and wood embellishment from Prima Marketing.


What i like about Graphic 45 papers is-- the design is so vintage, and you can simply cut out piece by piece for decoration.


The design looks like 3D when we assemble the embellishment layer by layer.


This is a great experience with Angeline about Shadow Box, hope to do it again!

Tuesday, June 24, 2014

When Decoupage meet Scappy

I always love to make things that is out of norm, so here i come to combine the scrappy art and decoupage together. What i like about decoupage is you can apply on any surface like wood, glass, steel, cloth & etc... and with base coat and protection coat, it will turn the item into pretty stuff.
For me, i prefer wood surface and do have few samples to show.

This wood hanger i found in a local shop which sell a lot of cute stuff. The sentiment is from Unity Stamp, Learn-live-hope stamp.


This is memo holder and i add some blink stone around the cup cake.


This is another wood hanger. I'm using Donna Poppies from Donna Downey and Lasting Thoughts kit from Unity Stamp. Trust me, the Poppies flower is very huge and it's really good for canvas projects. I've add some butterfly to make it more 3D.


I order this Welcome hanger from Taiwan, and i have a strong feeling that this hanger is suitable to put in house, thus i decided to do it for house deco. The stamp is from Better Together kom 7/11, then i colored it with my FINE Color marker pen. For the background, i'm using yellow and green spray paint.


This butterfly hanger also order from Taiwan, and i've try with my stencil from The Crafters Workshop with the color spray paint, and the results is amazing! 

That's all for my post today, will upload more when i've done my art works.

Tuesday, June 17, 2014

Mixed Media Canvas - Present for 21st Birthday Girl

From previous post, your know that I love to do handmade item from friends birthday. Well, this round i decided to do a canvas as a present for my junior birthday, who are celebrating her 21st Birthday this year! 
Browsing through her photos, and i decided to do a layout with this photo, where all my lovely junior is in the photo. 

This is my 3rd time hands on Mixed Media Canvas, and with the advice from my scrappy friend - Angeline, I'm trying to used Tim Holtz Distress Paint for this canvas. 

To make you have a better idea, i just let you know what I've used for the layout. First, you need to have a 12" x 12" canvas (mine is canvas board), then get your favorite distress paint color (mine is Mustard Seed & Broken China). 

For the background, i'm using tissue papers, some pattern papers, lace and Burlap. Then you may want to have some embellishments like flowers, metal charms, stickers, ribbons, stencil with spray paints and etc.


This is the final layout, and after I've done, i really fall in love with it, it's all my hard work there!


In my layout, I'm using some Prima flowers and some metal charms from Prima as well. Notice the brown and yellow pattern behind the flowers? I'm using the spray paint with stencil to create the effect.


Then I'm adding the die cut Happy Birthday words on a burlap, adding with a metal key and butterfly. I do used the Classified Newsprint Stamp from Unity to enhance the background, then at used the yellow alphabet sticker to form her name.

 This is a close up for a corner. I add a die cut butterfly strip which i bought over from a bazaar, and it just look pretty good with the layout.


Here is another corner close up. 

I'm not really good in posting tutorial, but i think i can try one next time.
Thanks for stopping by.

Friday, June 13, 2014

First discover with Mixed Media Canvas (back in March 14)

Well, this is my first discover with Mixed Media Canvas with Nathalie Kbach back in March 14,and she just awesome and fun! You may check out her profile by clicking the link above.

To give a better understand of Mixed Media, i just go wiki and get the summary as below:
Mixed media, in visual art, refers to an artwork in the making of which more than one medium has been employed.
Mixed media tends to refer to a work of visual art that combines various traditionally distinct visual art media. For example, a work on canvas that combines paint, ink, and collage could properly be called a "mixed media" work.
When creating a painted or photographed work using mixed media it is important to choose the layers carefully and allow enough drying time between the layers to ensure the final work will have structural integrity. If many different media are used it is equally important to choose a sturdy foundation upon which the different layers are imposed.
Now, here is my first Mixed Media Canvas! I just list down what I've used to create this art work.


Below Canvas is my own project after the class, and the material i used is almost the same as above. The different is i'm using the normal Acrylic Paint instead of the Fluid High Flow Acrylic Paint. Notice that the color will be solid and the layer actually can't really see through compare with the previous artwork.

For the image, I'm using Let-love-fly Stamp from Unity, and this image touch my heart when i first saw from Unity page. Then i added some Prima Flower and the butterfly from Webster Pages.


For more ideas and understanding about mixed media, you may check these video from you tube:


Or this video:


I just love the Mixed Media Project, guess will have more project comes up, stay tune!

Thursday, June 12, 2014

Cards for Wedding, Birthday and Congratulation!


I always love to make card for all occasions. Here is some cards that I've make for different occasions and it's full with blessing and cares!


This is the wedding card together with the envelope. 
I'm using the free emboss folder from a magazine, and adding some Distress Ink at the border to make the card look vintage. Notice the envelope behind? I've add a Doily on the envelope to make it special. :)


For the center, I've add a "Celebrate" sticker together with some Prima Flowers.


To make is lively, I just add 2 butterfly as decoration, and the card is finish!


This is another order to make card for a junior of mine, who wants to celebrate the birthday of the Youth group Leader. Hey, Happy Birthday uncle Stephen!


This is a congratulation card for a another junior of mine, whom manage to get the highest achievement awards in the Girls' Brigade - the PIONEER PIN which is so difficult to get it.
With such an honor, i made this card to congrats her for this joyful moment!  

I always love to make cards with blessing and love, hope these cards can inspired you to make your own card today!

Monday, June 9, 2014

Disney Princess Layout

Recently I've helped a friend of mine to do a Disney Princess Scrapbook Layout as a gift. She do provide me some photos and Disney princess dress stickers, so i've choose a pink dress stickers in order to match the dress colour of the little girl in the photo.

Here are some photos and close up for reference.

This is the first complete layout.


I've add some Prima flowers which is pink colour too!


The Cute Pink Princess dress with the boot.


I do add some glitter butterfly as deco.


 This is the final layout which i've add some stone on the dress and on the butterfly. This is the first time I custom made for someone, and i really like the outcome of the layout.